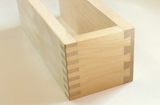
Joining box corners
Quite often, I have to join the corners of a plywood box. The trick is how to join the pieces in a way that is sturdy and looks good. My finger/box jointing jig is not that suitable for plywood, especially not for wide pieces. What I do in cases like that is to glue the pieces together with a rabbet joint, and then insert triangle shaped pieces into the corners.
 First I cut the
rabbet joint, then glue it together and let the glue set so that the
joint is rigid, although not super strong. Next, I cut the slots.
I
stack
two or three saw
blades, depending on how wide I want the cut to be. Then I put the
box (or whatever I'm making) on my table saw, and cut the slot out in
one pass over the saw. A sliding table or "panel saw" type jig is essential if
the box is not s small one.. I'm also careful not to
back over the cut once I made it, so that hopefully, its precisely the
same width as the other cuts. Getting the width of cut by making
multiple passes over the saw would not guarantee a consistent width of cut.
I make the cut as deep as I can, although not deep enough that the insert
will interfer with anything inside the box, such as drawers.
First I cut the
rabbet joint, then glue it together and let the glue set so that the
joint is rigid, although not super strong. Next, I cut the slots.
I
stack
two or three saw
blades, depending on how wide I want the cut to be. Then I put the
box (or whatever I'm making) on my table saw, and cut the slot out in
one pass over the saw. A sliding table or "panel saw" type jig is essential if
the box is not s small one.. I'm also careful not to
back over the cut once I made it, so that hopefully, its precisely the
same width as the other cuts. Getting the width of cut by making
multiple passes over the saw would not guarantee a consistent width of cut.
I make the cut as deep as I can, although not deep enough that the insert
will interfer with anything inside the box, such as drawers.
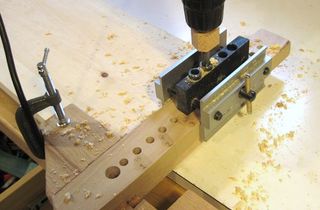
 The next
step is to make the inserts. These need to be very precise. This
is where the trick comes in. First, cut some strips of
hardwood on the table saw, but about half a millimeter wider than
the slot they need to fit into. Its best to cut several strips,
just to be safe. Then, adjust the fence to the exact width of the
slot. I use a caliper to make these measurements. I rip just the
first 5 cm of a strip and check that it fits snugly in the slots,
and ajust if necessary.
The next
step is to make the inserts. These need to be very precise. This
is where the trick comes in. First, cut some strips of
hardwood on the table saw, but about half a millimeter wider than
the slot they need to fit into. Its best to cut several strips,
just to be safe. Then, adjust the fence to the exact width of the
slot. I use a caliper to make these measurements. I rip just the
first 5 cm of a strip and check that it fits snugly in the slots,
and ajust if necessary.
Because only the right edge of the sawblade will actually be cutting wood, the strip gets pushed up against the fence as its cut, ensuring a consistent width of cut.
Once you are happy with the fit, cut the strips to width. A note of caution here: If your throat insert has a relatively large hole, as many metal throat inserts do, your piece may get pulled down next to the blade. This won't just ruin your piece, its also dangerous. I always use a home made zero clerance insert for this step.
Blade guards could also be dangerous for this job, because they get in the way.
The next step is to cut out the triangles on a band saw. Cut these to be bigger than you need them.
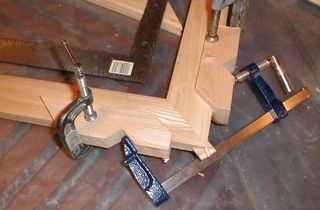
Before applying glue, make sure each triangle fits nicely in the slot you want to glue it in. Then spread glue on the inside of the slot, using a thin strip of wood (about 1mm thick is ideal). Apply glue to both sides of the triangle, and insert. Its important to do this quickly. The glue makes the wood swell, so if you take too long, it may no longer fit. Ideally, you slip the piece in in one motion. As soon as you stop, it may bind. Glue in tight spots binds very rapidly. I find that sometimes I can't push the piece in all the way with my hands. Its best to have a hammer close at hand!. Just be sure to hit the triangle on the sides and not the corners.
 If you do hit the piece with a hammer, don't hit it on the corner - it
will just break there. Hit it on either side, like on this
picture. You may find that you have to hit it as hard as if you
were driving in a nail if you aren't fast enough. Having the wedge
oversized really helps to drive it in without damaging the surrounding
wood.
If you do hit the piece with a hammer, don't hit it on the corner - it
will just break there. Hit it on either side, like on this
picture. You may find that you have to hit it as hard as if you
were driving in a nail if you aren't fast enough. Having the wedge
oversized really helps to drive it in without damaging the surrounding
wood.
After letting the glue dry, the pieces need to be trimmed flush.
I prefer to wait for the glue on the surface to harden, so its less
messy. If you try to wipe off the glue while its still wet, you
may just end up spreading it further on your work piece, and you won't
really see it until you apply varnish.
Trimming the pieces
The trimming is the really time consuming part.


I use a Japanese "dozuki" saw - actually, a clone of one, to be
precise. These saws have very narrow blades with very fine
and sharp teeth. They also have a tendency to break teeth in
hardwood if used roughly. So far, mine hasn't lost any
teeth. I got mine from
Lee Valley Tools (mail order).
I put a spacer underneath the blade to keep the saw from
scratching the surface. I used a strip of wood about 0.5 mm
thick. Boxboard would also work, but perhaps a little thick.
A photograph print (if you have one you would throw out) would be about
ideal.
Next use a chisel to cut it flat to the surface. Make sure your
chisel is wider than the piece your are trimming. This helps guide
the chisel against the surrounding wood. Its tempting to take a
1" chisel, and dull it in such a way that it will only cut in the middle, but
not on the corners, specifically for jobs like this. But I don't do
this often enough to bastardize a chisel for. In the pictures
shown, the box I made was from reclaimed plywood that I cut from a
discarded library carel, so it was already varnished. I managed
to trim the pieces flush to the surface without damaging the
surrounding varnish, but not on every piece. Your chisel should be
sharp enough that you can push it through the wood, without the need
to even tap it on the back.
You may chose to sand the pieces flat instead, but this might not work all that well. If you are using veneered plywood, you may go through the veneer in some places before the piece is flush. This because the end-grain of a piece of hardwood is much tougher than the flat veneer. Using a cabiner scraper might work better.
See also:
Screw advance box joint jig |
 Dovetail joint vs Box joint a relative strength test |
Half decent way of doing miter joints |
Doweling T-square |
To my Woodworking website