 So I improved on my mechanism by building a ratcheting winch to tension
the spring. I cut a wheel out of plywood with 12 ratchet
teeth in it. I attached a small drum to the wheel for winding up rope with.
So I improved on my mechanism by building a ratcheting winch to tension
the spring. I cut a wheel out of plywood with 12 ratchet
teeth in it. I attached a small drum to the wheel for winding up rope with.
So I improved on my mechanism by building a ratcheting winch to tension
the spring. I cut a wheel out of plywood with 12 ratchet
teeth in it. I attached a small drum to the wheel for winding up rope with.
The drum is made of a piece of maple with the grain running side to side, and I cut it out to have a wide flange to glue to the plywood with just to make sure I'd make good contact. After I glued it in place, I drilled a 1/4" hole through the middle of the wheel and drum for a shaft.
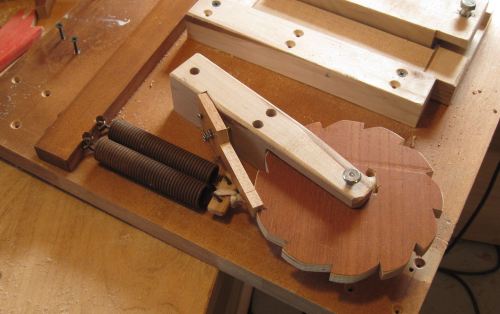 I made a bracket for mounting this ratcheting wheel to the back of my bandsaw,
and also made a wooden ratchet to hold the tension on the wheel.
I made a bracket for mounting this ratcheting wheel to the back of my bandsaw,
and also made a wooden ratchet to hold the tension on the wheel.
I also changed my setup from one springs to two for extra tension.
I found that I was able to tighten the springs quite a lot just by turning the wheel with my hands. But releasing the tension was a bit dangerous, and while trying it out the wheel spun out while I had my fingers on it. One of the teeth put a small hole in the tip of my right index finger and I spilled a few drops of blood on my project. It's these little things that aren't even supposed to be dangerous that get me, because I'm not ready for it. Not a serious injury, but it made typing awkward for a few days.
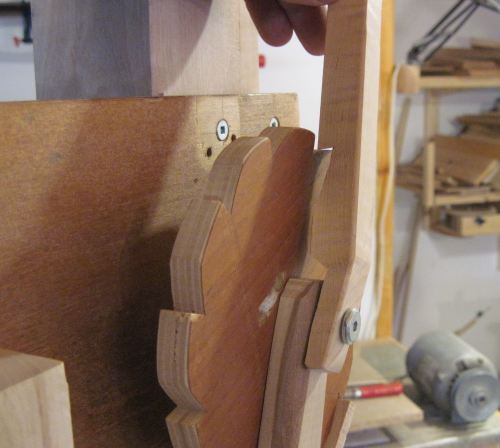 To avoid further injury, I made a simple lever to operate the tensioner wheel with.
The lever is loose on the bolt that it rotates on, so that it can be tilted
into and away from the ratchet gear. It makes it really quick and easy to tension
or de-tension the blade. And I love the sound the ratchet makes when tensioning
the blade. One drawback is that it's so satisfying and easy to tension the
blade that it's too tempting to just ratchet it up to maximum tension every time.
To avoid further injury, I made a simple lever to operate the tensioner wheel with.
The lever is loose on the bolt that it rotates on, so that it can be tilted
into and away from the ratchet gear. It makes it really quick and easy to tension
or de-tension the blade. And I love the sound the ratchet makes when tensioning
the blade. One drawback is that it's so satisfying and easy to tension the
blade that it's too tempting to just ratchet it up to maximum tension every time.
When I designed my second bandsaw, with the intention of making plans available, I came up with a much simpler design.
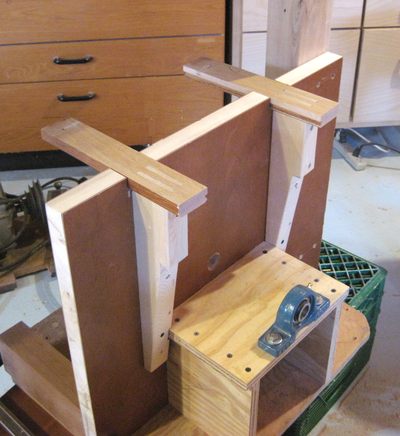 Next I made some supports for the table. These consist of horizontal pieces of oak
that I cut from a recycled cabinet door, and spruce uprights cut from a 2x4.
Next I made some supports for the table. These consist of horizontal pieces of oak
that I cut from a recycled cabinet door, and spruce uprights cut from a 2x4.
 I joined the pieces with a double tenon joint. I cut two 1/4" (6mm) mortises separated by 5/8" (16 mm).
This left 3/8" (10 mm) in between. I cut the tenons using my
slot mortising machine as well,
using a 3/8" router bit to clean up both cheeks and the space in between. I found that
this resulted in an overly tight joint, so it's likely that my 3/8" or 1/4" bit cut
away just a bit less than specified. So for each slot with the 3/8" bit, I'd cut it
and then turn the vertical adjustment crank by 1/6'th of a turn to the next click
stop and cut it again to widen my 3/8" slots by about .010" (.25 mm). The resulting
tenons were a bit narrower and easily fit into the mortises.
I joined the pieces with a double tenon joint. I cut two 1/4" (6mm) mortises separated by 5/8" (16 mm).
This left 3/8" (10 mm) in between. I cut the tenons using my
slot mortising machine as well,
using a 3/8" router bit to clean up both cheeks and the space in between. I found that
this resulted in an overly tight joint, so it's likely that my 3/8" or 1/4" bit cut
away just a bit less than specified. So for each slot with the 3/8" bit, I'd cut it
and then turn the vertical adjustment crank by 1/6'th of a turn to the next click
stop and cut it again to widen my 3/8" slots by about .010" (.25 mm). The resulting
tenons were a bit narrower and easily fit into the mortises.
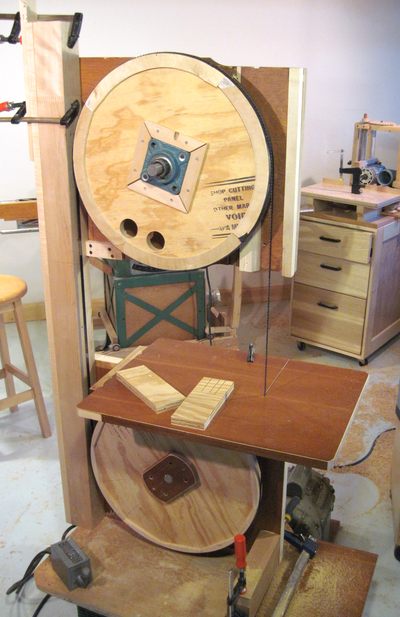 Now that I had a table support and blade tensioning mechanism, it was time to
do some more testing. This time, I propped the saw up on a milk crate and a bucket
to bring it to a more comfortable height. I also did a coarse balance on the top wheel
to cut down on shaking. The two big holes I drilled in the top wheel brought it more into balance.
As a safety precaution, I also clamped a piece of wood to the post which I attached
to the ceiling. My hope was that this would prevent the whole shaky and wobbly arrangement
from tipping over.
Now that I had a table support and blade tensioning mechanism, it was time to
do some more testing. This time, I propped the saw up on a milk crate and a bucket
to bring it to a more comfortable height. I also did a coarse balance on the top wheel
to cut down on shaking. The two big holes I drilled in the top wheel brought it more into balance.
As a safety precaution, I also clamped a piece of wood to the post which I attached
to the ceiling. My hope was that this would prevent the whole shaky and wobbly arrangement
from tipping over.
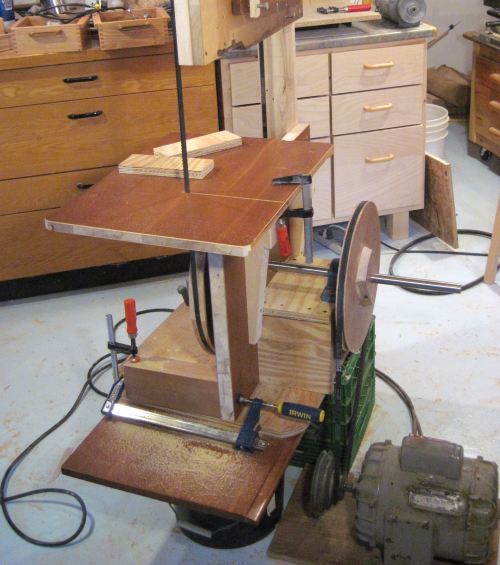 With my more powerful blade tensioning mechanism, I experimented some more. I was
able to make some cuts without any blade guides at all. The blade's tracking
on the crowned pulleys was working well enough to resist the force of me pushing
a piece of wood against the blade. This, even though my bottom wheel was
just wood, without any sort of bandsaw tire on it. My thinking was that with
the crowned wooden wheels, my bandsaw really didn't need any tires.
With my more powerful blade tensioning mechanism, I experimented some more. I was
able to make some cuts without any blade guides at all. The blade's tracking
on the crowned pulleys was working well enough to resist the force of me pushing
a piece of wood against the blade. This, even though my bottom wheel was
just wood, without any sort of bandsaw tire on it. My thinking was that with
the crowned wooden wheels, my bandsaw really didn't need any tires.
 I rebuilt my upper blade guide to just use fixed wooden blocks. I have a piece
of lignum vitae to make the blocks out of, but for the initial experiment, I just
used some maple and soaked it with oil. That oil soaked maple has been holding up
fairly well, so I have still not made guide blocks out of lignum vitae.
This whole bandsaw project is a series of experiments, and if the initial experiment
works, I may or may not revisit it to improve it.
I rebuilt my upper blade guide to just use fixed wooden blocks. I have a piece
of lignum vitae to make the blocks out of, but for the initial experiment, I just
used some maple and soaked it with oil. That oil soaked maple has been holding up
fairly well, so I have still not made guide blocks out of lignum vitae.
This whole bandsaw project is a series of experiments, and if the initial experiment
works, I may or may not revisit it to improve it.
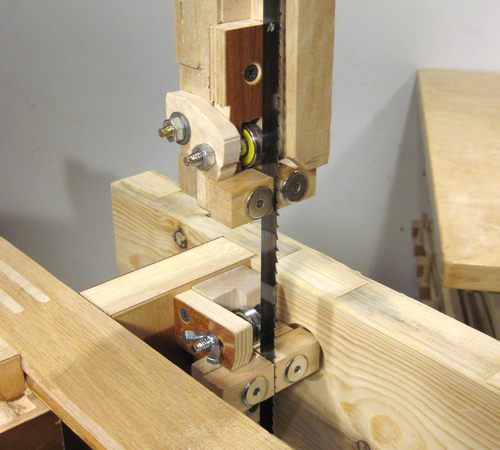
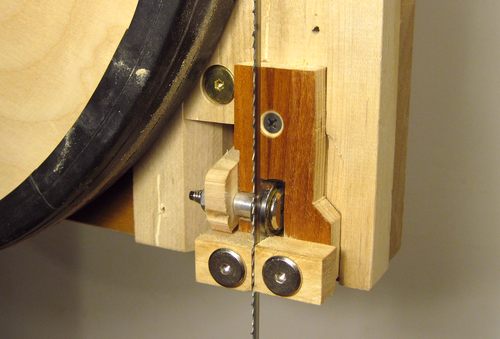
 On regular bandsaws, the bar that moves the upper blade guides up and down is often
fairly far back from the blade, with the blade guides extending forward from it.
Wood isn't as stiff as metal, so I opted for a different design.
The bar that holds the blade guide is actually mounted on the
front of the top plywood, just behind the wheel. In fact, there is very little
clearance between the back edge of the top wheel and this mechanism, and I had to
remove the top wheel to take this photo.
On regular bandsaws, the bar that moves the upper blade guides up and down is often
fairly far back from the blade, with the blade guides extending forward from it.
Wood isn't as stiff as metal, so I opted for a different design.
The bar that holds the blade guide is actually mounted on the
front of the top plywood, just behind the wheel. In fact, there is very little
clearance between the back edge of the top wheel and this mechanism, and I had to
remove the top wheel to take this photo.
The wedge towards the center is pulled back against the plywood by a screw. The piece on the left of the wedge is fixed, and the piece to the right is the bar for the blade guide. When the wedge is pulled back, it pushes the bar into the corner, locking it vertically and wedging it in place laterally.
 I wanted the saw to have a lot of resaw depth. I made the top blade guide
so that it can be moved all the way up and into the housing of the saw.
Moving the blade guide all the way up is a bit awkward though, because the
locking wedge needs to be repositioned, and the blade guard needs to be detached
from the bar to keep it from hitting the wheel.
With the guide bar all the way up, I can get 28 cm, or about 11" of cutting depth.
I think 30 cm or 12" of resaw depth is more typical for a bandsaw with 18" (45 cm) wheels,
but most of these bandsaws are a fair bit larger than this one and also use
longer blades. Mine uses 116" (295 cm) long blades.
Busy bee machine tools
sells that length of blades to go with their 16" bandsaw.
I wanted the saw to have a lot of resaw depth. I made the top blade guide
so that it can be moved all the way up and into the housing of the saw.
Moving the blade guide all the way up is a bit awkward though, because the
locking wedge needs to be repositioned, and the blade guard needs to be detached
from the bar to keep it from hitting the wheel.
With the guide bar all the way up, I can get 28 cm, or about 11" of cutting depth.
I think 30 cm or 12" of resaw depth is more typical for a bandsaw with 18" (45 cm) wheels,
but most of these bandsaws are a fair bit larger than this one and also use
longer blades. Mine uses 116" (295 cm) long blades.
Busy bee machine tools
sells that length of blades to go with their 16" bandsaw.
I shot various video segments of my experiments while building this bandsaw
and edited them together to post on YouTube.
Next: Bandsaw stand, and reinforcing the frame
 Bandsaw blade guides (for a different saw)
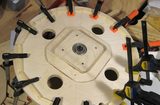 Refinements
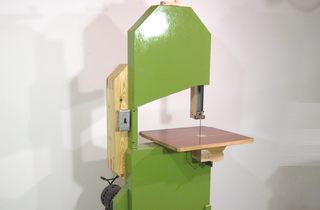 Homemade bandsaw version 2
 Homemade bandsaw tension gague